

How to Change Android DNS Settings [3 Methods Explained]
Changing the default DNS server for your cyberspace connexion has a lot of benefits, including enhanced rubber, better privacy, increased speed and more. You can change the DNS settings for your net connectedness on all modern PC and smartphone operating systems, including Windows, macOS, Linux, Android and iOS. Nosotros've already discussed how yous can alter DNS settings in Windows x, so today, we'll await at how we can change Android DNS settings on your smartphone and tablet.
Change Android DNS Settings on Phones and Tablets
While most people use the default DNS server provided by their Internet service provider (Internet service provider), there many reasons why changing that is a good idea. Third-party DNS servers are ofttimes faster, safer and more than private, and some of them are also more configurable. And then today, we'll take a await at how you can change Android DNS settings in a few piece of cake steps. We will also learn almost what DNS is and how it may be beneficial to change information technology on your arrangement.
What is DNS?
DNS, or Domain Proper noun System, is often described equally the phone book of the internet, and not without reason. It helps the spider web browser on your PC or smartphone connect to websites by translating elementary domain names like 'beebom.com' to machine-friendly IP addresses similar 104.17.8.12 (IPV4 accost for Beebom.com). Without DNS, it would be impossible to access web-servers via friendly URLs, and you'd accept to type 104.17.8.12 in your browser's address bar every time to access this site.
Benefits of Using Tertiary-party DNS
While most people simply use the default DNS servers provided by their Internet service provider, options from third-parties often bring better results in more ways than one. Using a tertiary-party DNS server tin can offering you lot better speeds, depending on how close you are to their servers. Some ISPs also record your cyberspace browsing history and share them with third-parties without your noesis. Using safe, no-log DNS services will help preserve your online privacy.
Third-party DNS servers can also help y'all unlock region-blocked content and bypass censorship, given that much of the censored websites are blocked via DNS. Last, merely definitely not the least, some third-party DNS providers, similar OpenDNS and Quad9, volition as well protect you confronting malicious sites and other forms of cyber threats. OpenDNS likewise offers parental command and custom filtering options.
How to Alter DNS on Android
How you configure the default DNS server on Android depends on the Android version. Information technology is relatively simpler on devices running Android 9 Pie and newer, but is a lilliputian more complicated on Android 8.1 Oreo and older. To check your Android version, go to Settings and search for 'About', 'Virtually Telephone', 'System' or something similar (typically either the very first or very last option in the Settings page). Curlicue down on the About/System page and yous'll see your Android version listed somewhere in there.
Notation: As with all things Android, the exact menu options might differ from ane device to another based on Android version and manufacturer.
Modify DNS on Android nine Pie and Newer
Android 9 and higher up only support DNS-over-TLS, so not all third-party DNS servers are compatible with the platform. Before configuring, check if your preferred DNS service provider offers DNS-over-TLS. As well, these settings have no effect when yous employ a VPN, which overrides private DNS configurations.
- To change the DNS server on Android 9 Pie and newer, go to Settings > Network & Internet.

- On the adjacent folio, aggrandize the 'Advanced' menu and select the option that says 'Individual DNS'. It should say 'Automatic' if it hasn't already been configured manually.

- In the popup box, select 'Private DNS provider hostname' and type in a TLS hostname (non simply a standard IPV4 address). Finally, hit 'Relieve'. As you can meet, I've now successfully configured this device to use Google DNS for all connections.
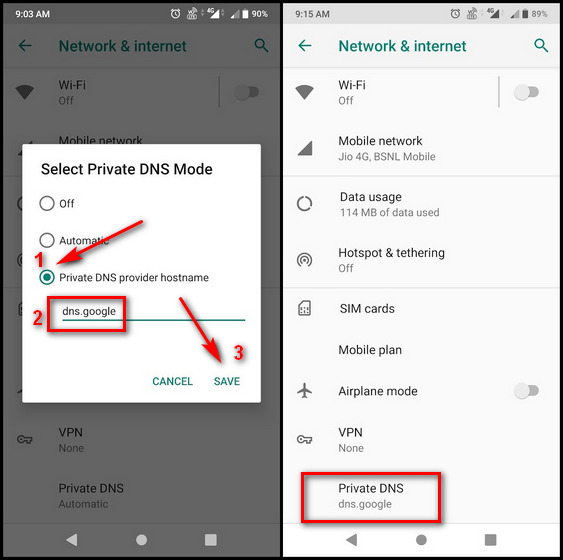
Note: I wanted to configure Google DNS, so I typed in dns.google (instead of viii.8.8.8 or 8.8.4.four) as the hostname of the DNS provider. Your entry would depend on your chosen DNS service.
Modify DNS on Android 8.i Oreo and Older (Difficult Manner)
Android Oreo and older versions do non permit you to change DNS servers for cellular networks, which means the following DNS settings simply piece of work for Wi-Fi connections. Fifty-fifty and then, the changes are network specific and, y'all'll need to change the DNS servers every time you connect to a new wireless network. What's more, you'll also have to configure all network information manually, so these changes are only recommended for advanced users.
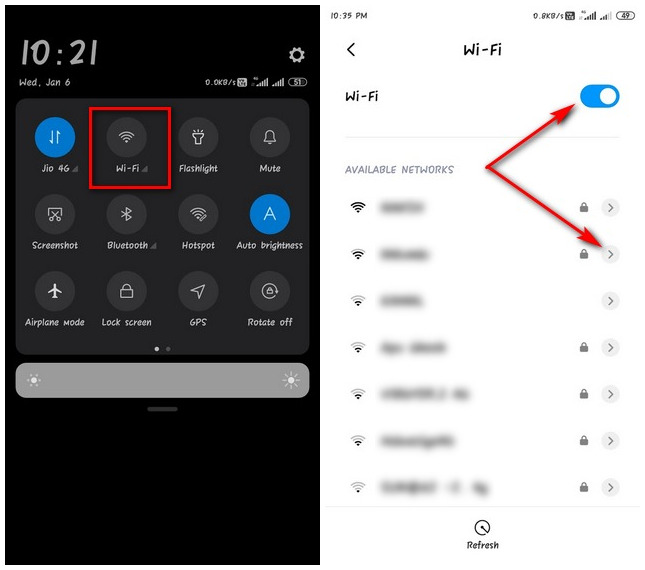
- To make changes to a Wi-Fi network, turn on Wi-Fi on your Android device and long printing the Wi-Fi icon in the Quick Settings panel to become to the Wi-Fi Settings page. Next, depending on your device, either long press on the target network's proper name and select 'Modify network > Advanced settings' or tap on the 'arrow' next to the network's name to access the configuration options.
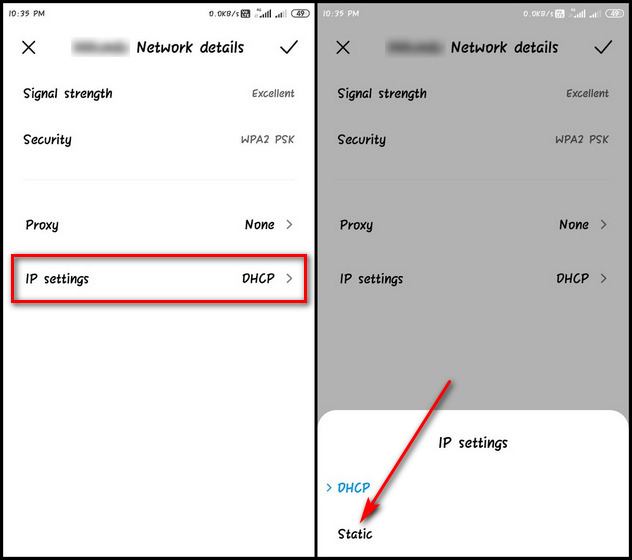
- Find the carte du jour particular that says 'IP Settings'. Chances are, it volition say 'DHCP' (Dynamic Host Configuration Protocol). Change that to 'Static' to manually cull your DNS provider.
- Now you'll demand to not just fill up in your preferred DNS addresses, simply too manually specify your IP accost and the Wi-Fi router's gateway. Remember to relieve your configuration before exiting.
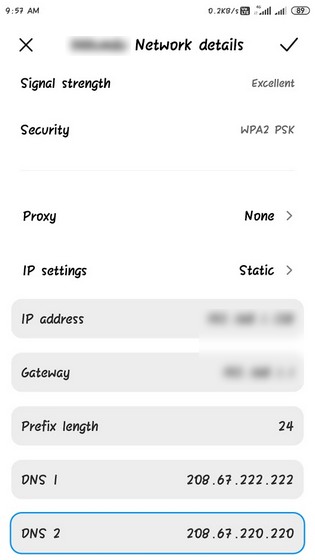
Annotation: It's appropriate that you only exercise this for your own Wi-Fi router and non for shared or public routers. Also, mine is configured for Open DNS, but y'all tin cull any third-party DNS provider you prefer.
Change DNS on Android eight.one Oreo and Older (Easy Manner)
The aforementioned method of irresolute DNS on older Android devices tin be a picayune intimidating for many users. What'south fifty-fifty more abrasive is that it has to be repeated for each and every new connection individually. All the same, the unkindest cut is that information technology withal won't work with cellular connections.
Thankfully, in that location's an easy way of doing this. Every bit with almost everything these days, there'due south an app for that. In fact, there are multiple apps, and the all-time part is that they also work with mobile connections. Like on your PC, you'll merely have to configure information technology once for it piece of work organisation-broad across every Wi-Fi and cellular connection.
So head over to the Play Store and download a free DNS changer app of your pick. Ii of the best options are the open source and ad-free DNSChanger for IPv4/IPv6 (download) and Open DNS Changer (download). I'm using the kickoff 1 for today'due south demo.
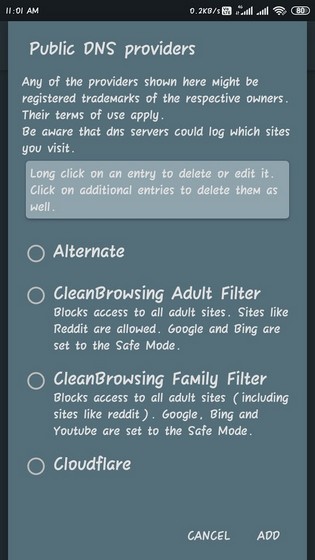
- Open 'DNSChanger for IPv4/IPv6'. On the home screen, tap on 'Default DNS addresses'. So scroll down to find numerous pre-configured options, including OpenDNS, Google DNS, CloudFlare DNS and more. Accept your pick.
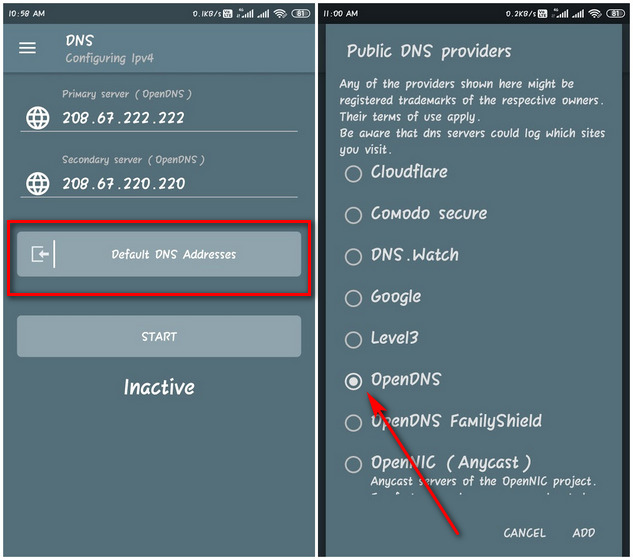
- If you don't see your preferred DNS service in the list, yous can manually type in whatsoever custom IPv4 or IPv6 DNS server on the habitation page, every bit seen in the left screenshot above. The app also lets you configure your connection to block developed websites, and you get multiple options nigh which sites to block and which ones not to.
DNS Changer for IPv4 & IPv6 works without root for both Wi-Fi and cellular connections. However, to make this possible, all traffic is redirected using a VPN. Information technology's not the most efficient solution, but the but available pick on older Android devices without root. Meanwhile, if you want to use CloudFlare DNS, you lot might not take to use a third-party app. CloudFlare has its own 'WARP' app for Android, iOS, Windows and macOS.
Configure Your Preferred Private DNS Setting on Whatever Android Device
So at that place you go. Now you know how to modify the DNS setting on Android devices irrespective of the manufacturer or Android version. While you'll demand a petty more than elbow grease on older devices, information technology is still well worth it in most cases. So become ahead, configure your Android telephone or tablet to use any custom IPv4 or IPv6 DNS server and let us know how that went.

Source: https://beebom.com/change-android-dns-settings/
Posted by: williamswriandroura1953.blogspot.com
0 Response to "How to Change Android DNS Settings [3 Methods Explained]"
Post a Comment